More Product Details
The correct installation of your SUPER TILES product is vital to the overall appearance of your investment. Your SUPER TILES product should not only enhance the look and value of your property but should be practical and long lasting too.
Contractor We recommend that an experienced contractor installs all SUPER TILES products. To achieve the best results from your pavers it is recommended that your base preparation, bedding layer and grouting be specified by a qualified engineer. The paving installation should be done by a paving contractor who is familiar with the installation of SUPER TILES products.
If however, you choose to install the product yourself consider the following steps to ensure a successful outcome.
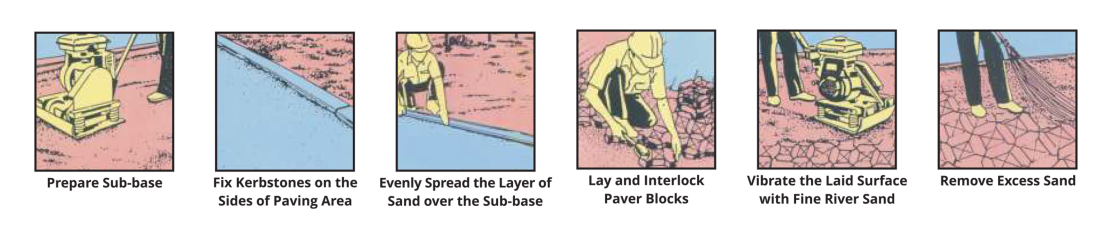
1. Base Preparation
It is critical to the long lasting stability of your paving that the supporting base for your pavers be property constructed.
The four main aspects of the base preparation are:
- Drainage
- Sub -grade
- Base -course
- Bedding course
a. Drainage
Good drainage prevents the accumulation of sub -surface water underneath the paved area known as sub -surface ponding.
- The excavated surface should have a fall (minimum 1 : 50) so that any moisture will flow to a drainage point.
- It is recomThe sub -grade is the upper part of the soil, natural or constructed, which supports the loads transmitted by the overlying paving.mended that the top of the paving is a minimum of 75mm below the damp proof course of the building.
- Place a plastic membrane against any exposed foundation.
b. Sub -grade
The sub -grade is the upper part of the soil, natural or constructed, which supports the loads transmitted by the overlying paving.
- All vegetation and top soil must be removed.
- Must be well drained and compacted.
c. Base -course
The base -course is the foundation for the pavers.
- The base -course should be made from gravel or G5 and can be stabilized using cement.
- Varies in thickness between 50mm and 120mm depending on the type of sub -grade and whether the paved area is for a footpath or driveway.
- Footpath pavers can be laid without a base -course where the sub -grade -inaterial is compact and uniform.
- The compacted surface should be tight or close knit to prevent migration downwards of the bedding course material.
d.Bedding Course
The layer that the pavers rest on. Well graded, washed river sand is used as a bedding course material for paving.
- Between 20mm and 25mm thick.
- Carefully screened (level) with a straightedge.
- Must be moist when the pavers are placed.
- Cement may be added to the base -course to further stabilize this layer.
2. Setting out
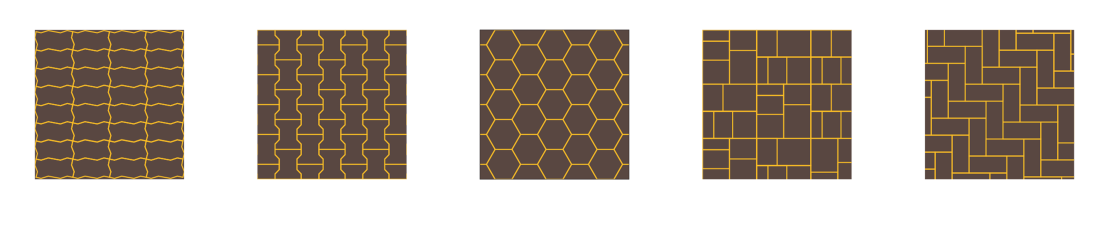
Ensuring that your paving pattern stays aligned.
- Use setting out lines (this is a grid of string/nylon lines spaced at exact intervals).
- Constantly re -check your lines in all directions while installing the pavers
3. Handling of products
To minimize damage to pavers during transport.
- Transport in an upright position.
- Carry pavers by hand to the laying area, underside to underside.
- Cobbles should be transported in a wheelbarrow and be packed and unpacked individually by hand.
4. Laying the Pavers
SUPER TILES products are designed to resemble natural stone, and do have variances in dimensions and colour.
- Product must be drawn from different consignments to ensure blending of different batches.
- Uneven pavers should be rotated to match adjoining pavers, or replaced and used for cutting.
- Concrete is brittle. Consequently it can be expected that up to 5% of the product will have small chips when delivered. This is normally allowed for by the paver when ordering. Chipped products should be used for cutting where possible.
5. Cutting
If necessary, SUPER TILES pavers can be cut:
- With a brick cutting machine or;
- With an angle grinder (with a diamond tipped blade).
6. Edge Restraints
Restrain the perimeter of the laid paving to prevent the washing out of the bedding sand (this will cause subsidence of the pavers on the edge and could result in movement of the pavers). Good edge restrains are:
- reinforced concrete
- kerb stones
- edge pavers bedded in a concrete base.
7. Joint Filling
There are two types of paving installations; namely rigid and flexible paving. With the rigid installation method the spaces between the pavers are filled with a wet slurry mix known as grouting. With the flexible installation method dry sand is swept in between the pavers to secure them in place.
Please see details on the joint filling material and their respective installation techniques below
7a. Grouting for a Rigid Installation
Products are porous and must be thoroughly wet prior to the application of the slurry to avoid cement staining.
- A 1:3 cement / plaster sand slurry mix is strongly recommended.
- When a slurry is used. ensure that excess grouting is washed off the textured surface with a fine hose spray, or with a sponge immediately.
- Rinse sponge frequently in clean water. Any residue will result in cement staining.
- Freshly grouted pavers should not be trafficked.
- Cordoning off the new paving for 7 days, with no pedestrian or vehicle traffic, is recommended.
- Cure the grouting by wetting the paving and joints with a fine spray for a few days after grouting. Keeping the grouting moist will prevent cracks. Beware not to wash the grouting out.
8. Compaction of Paving
It is recommended that newly laic pavers be compacted by:
- A light roller compactor with the vibrator switched off. This is the method used for cobbles and pavers.
- A rubber mallet. This is the method used for flagstones.
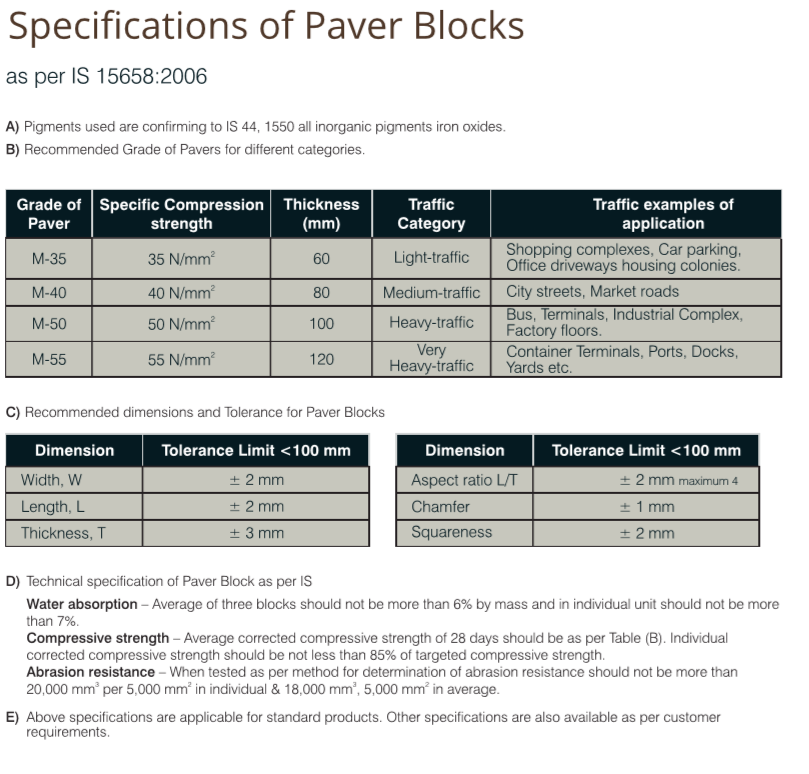
ISO Specifications